

Extra Celestial Nails: Opal Chrome, Diamond Dust Tips, Cloud French & Lunar Details
From opal chrome to cloud French tips, this blog captures the most luxurious celestial nail trends of 2026.
FASHION
FONNI
12/28/20259 min read
The content on this site was created with the help of AI. LOVEOWE LLC participates in the Amazon Services LLC Associates Program and other affiliate programs. As an Amazon Associate, I earn from qualifying purchases. This means I may earn a small commission—at no extra cost to you—when you make a purchase through links on this site. All opinions are my own. Learn more click here. Thank you for your support!
Your nails are the ultimate canvas for personal expression, and 2026's most ethereal trend takes manicures beyond earthly bounds. I'm absolutely mesmerized by the Extra Celestial nail aesthetic—a dreamy fusion of iridescent opals, sparkling cosmic details, soft cloud-like effects, and lunar-inspired artistry that transforms fingertips into miniature galaxies. This isn't your typical glitter mani; it's sophisticated, otherworldly, and surprisingly wearable for those who appreciate beauty that catches light in unexpected ways.
Imagine glancing at your hands to find nails shimmering with opal chrome that shifts colors as you move, diamond dust creating constellation-like sparkle, soft cloud formations floating across translucent bases, and delicate moon phases adding mystical touch. By mastering celestial nail techniques—from chrome application to dust placement, airbrushed clouds to hand-painted lunar details—you create manicures that feel both artistic and accessible. This approach will transform how you think about nail art and establish signature looks that feel distinctly magical.
The beauty of Extra Celestial nails lies in their versatility and scalability. These techniques adapt from subtle everyday elegance to full cosmic drama, working across nail lengths and shapes. Whether you're DIY-ing at home or communicating your vision to nail techs, understanding these celestial elements ensures stunning results. Let's explore each technique and discover how to bring otherworldly beauty to your fingertips.
Understanding the Extra Celestial Aesthetic
Before attempting specific looks, understanding what makes nails "Extra Celestial" ensures cohesive, intentional results.
Defining Extra Celestial Nails
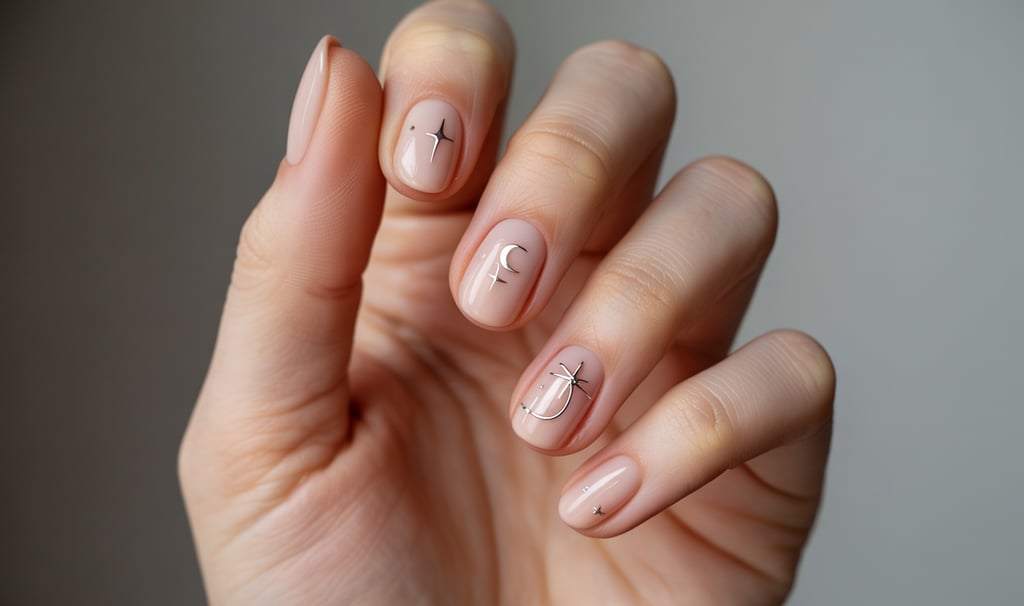
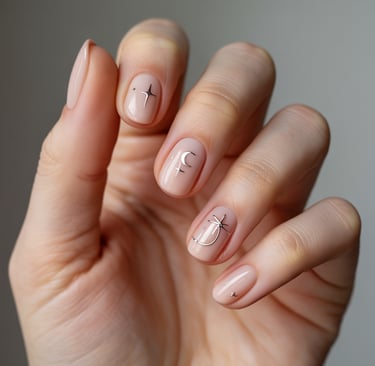
Extra Celestial represents nails inspired by cosmic beauty—stars, planets, moons, galaxies, and ethereal atmospheric phenomena. Key characteristics include:
Iridescent Effects:
Color-shifting chromes and duochromes
Opal-like multidimensional shine
Pearl and holographic finishes
Rainbow reflections
Sparkling Elements:
Diamond dust and micro-glitter
Constellation placements
Star details
Crystalline effects
Soft Atmospheric Elements:
Cloud formations
Nebula effects
Aurora-inspired gradients
Misty, dreamy finishes
Lunar and Celestial Symbols:
Moon phases
Stars and starbursts
Planets and orbits
Astrological symbols
Overall Aesthetic:
Ethereal and dreamy
Sophisticated sparkle (not costume)
Light-catching and dimensional
Mystical yet wearable
The Color Palette
Primary Colors:
Soft whites and creams
Pale blues and lavenders
Opal pinks and peaches
Translucent milky bases
Iridescent shifts
Accent Colors:
Silver and chrome
Gold and rose gold
Deep midnight blue
Soft purple and lilac
Pearl and mother-of-pearl
Avoid:
Harsh neons
Flat, non-reflective colors
Muddy or dark without purpose
Overly warm or orange tones
Extra Celestial vs. Other Nail Trends
vs. Galaxy Nails (2010s):
EC is softer, more sophisticated
Less dramatic color contrasts
More iridescence, less pigment
Refined rather than bold
vs. Simple Chrome:
EC incorporates multiple techniques
Adds dimension beyond flat chrome
Includes artistic elements
More complex and layered
vs. Classic French:
EC reimagines traditional techniques
Adds mystical elements
Maintains wearability with celestial flair
Opal Chrome: The Foundation Technique
Opal chrome creates that signature color-shifting, multidimensional base that defines Extra Celestial nails.
Understanding Chrome Powders
What They Are:
Ultra-fine metallic powder
Applied over gel polish
Creates mirror-like or iridescent finish
Rubs into surface creating seamless effect
Types of Chrome:
Opal/Aurora: Shifts through pink, blue, gold, green
Pearl: Soft, subtle shimmer
Holographic: Rainbow sparkle effect
Duochrome: Shifts between two specific colors
Unicorn: Multi-color shifting with intensity
Application Technique for Opal Chrome
What You Need:
Gel base coat
Color base (usually white or light pink)
No-wipe gel top coat
Chrome powder (opal/aurora)
Silicone or eyeshadow applicator
Gel top coat (regular, may cause slight dulling)
Step-by-Step:
Prep nails properly - Clean, shape, push back cuticles
Apply gel base coat - Cure under UV/LED lamp
Apply color base (2 coats white or pale pink) - Cure each coat
Apply no-wipe top coat - Cure fully
Apply chrome powder - Rub powder onto surface using applicator in circular motions
Buff powder - Continue rubbing until fully adhered and shiny
Remove excess - Brush away loose powder with soft brush
Seal with top coat - Apply gel top coat carefully, cure
Optional second top coat - For extra durability
Pro Tips:
Darker base colors create deeper opal effect
Very sticky no-wipe top coat works best
Apply powder while surface is slightly warm from curing
Use gentle pressure—too hard can create streaks
Seal edges carefully to prevent chipping
Color Combinations for Opal Chrome
Soft and Ethereal:
White base + opal chrome = dreamy pastel shifts
Pale pink base + pearl chrome = romantic shimmer
Lavender base + opal chrome = mystical purple shifts
More Dramatic:
Light gray base + holographic chrome = intense rainbow
Pale blue base + duochrome = blue-purple-pink shifts
Variations and Styling
Full Nail Coverage:
All nails in opal chrome
Classic and impactful
Most wearable for daily
Accent Nails:
Opal chrome on ring and middle fingers only
Remaining nails in complementary soft color
Balanced and sophisticated
Reverse French:
Opal chrome on base half
Soft color on tips
Modern twist on classic
Diamond Dust Tips: Sparkling Precision
Diamond dust creates constellation-like sparkle with refined placement.
Understanding Diamond Dust and Glitter Alternatives
True Diamond Dust:
Ultra-fine reflective particles
More subtle than traditional glitter
Creates glass-like sparkle
Expensive but stunning
Micro-Glitter Alternatives:
Fine holographic glitter
Iridescent micro-glitter
Crystal powder
Glass nail glitter
Choosing Your Sparkle:
Finer = more sophisticated
Holographic = more celestial
Clear/white = most versatile
Colored = more dramatic
Application Techniques
Method 1: Tip Encrusted
What you need:
Base color (gel or regular)
Clear gel polish or nail glue
Diamond dust or micro-glitter
Cleanup brush
Top coat
Steps:
Apply base color, cure/dry completely
Apply thin layer of clear gel to nail tips only
While wet, dip tip into diamond dust
Tap off excess
Cure if using gel
Clean up excess with brush
Seal with top coat
Method 2: Gradient Fade
Steps:
Apply base color
Apply clear gel from tip fading toward cuticle
Apply diamond dust, heavier at tips
Create gradient by tapping and blending
Cure and seal
Method 3: Constellation Placement
Steps:
Apply base color
Use dotting tool with clear gel
Place tiny "stars" of diamond dust
Create constellation patterns
Cure and seal
Design Ideas for Diamond Dust
Classic Tips:
Traditional French tips in diamond dust
Clean and elegant
Wearable for any occasion
Ombré Sparkle:
Heavy dust at tips fading to clear
Gradient effect
Dimensional and interesting
Accent Tips:
Dust only on accent nails
Pair with opal chrome on others
Balanced sparkle
Celestial Constellations:
Scattered dust creating star patterns
Connect with thin lines
Actual constellation designs
Edge Definition:
Dust only at very edge of tip
Creates defined, glowing outline
Sophisticated and subtle
Cloud French: Ethereal Reimagining
Cloud French techniques create soft, dreamy variations on classic French manicures.
Understanding Airbrush vs. Hand-Painted Clouds
Airbrush Clouds:
Most professional-looking
Soft, diffused edges
Requires airbrush tool
Salon technique
Hand-Painted Clouds:
Achievable at home
Uses sponging technique
More organic appearance
DIY-friendly
Gel Polish "Blooming":
Uses gel polish properties
Creates organic cloudlike effects
Requires specific technique
Beautiful natural results
Airbrush Cloud Technique (Salon)
Process:
Apply white or pale base color
Use airbrush with diluted white or pale blue
Create soft cloudy shapes on tips
Build up gradually in layers
Add dimension with multiple colors
Seal with top coat
Colors Used:
Pure white
Pale blue
Soft lavender
Light pink
Pearl white
DIY Sponge Cloud Technique
What You Need:
Base color (white, pale pink, or nude)
White and pale blue polish
Small makeup sponge or nail sponge
Dotting tool
Top coat
Cleanup brush and acetone
Step-by-Step:
Apply base - 2 coats of pale base color, let dry completely
Prep sponge - Cut small piece of fine-textured sponge
Load sponge - Dab into white polish
Dab onto tips - Light bouncing motion creating soft clouds
Add dimension - Use pale blue sponged very lightly
Blend - Continue dabbing to soften edges
Clean up - Use brush with acetone around cuticles and sides
Top coat - Seal when completely dry
Pro Tips:
Very light pressure creates softest effect
Layer gradually—easier to add than remove
Slightly damp sponge works better
Can add pearl or opal top coat for iridescence
Gel Polish Blooming Technique
Process:
Apply gel base coat, cure
Apply pale base color, cure
Apply small drops of white gel on tips
Use clean brush to spread and "bloom" the white
Creates organic, cloudlike diffusion
Cure before it spreads too far
Top coat and cure
Key:
Work quickly before curing
Use gel formulas designed to bloom
Practice creates best results
Cloud French Variations
Classic Cloud Tips:
White clouds on pale pink base
Traditional French shape
Soft and romantic
Blue Sky Clouds:
Pale blue base
White clouds
Sky-inspired
Sunset Clouds:
Peachy-pink gradient base
White and gold-shimmer clouds
Warm and glowing
Full Cloud Coverage:
Clouds extending beyond just tips
Covers 50-75% of nail
More artistic statement
Reverse Cloud French:
Clouds at cuticle area
Clear or pale tips
Unexpected twist
Lunar Details: Mystical Moon Elements
Moon phases and lunar imagery add mystical, celestial symbolism.
Types of Lunar Designs
Moon Phases:
New moon (dark circle)
Waxing/waning crescents
Half moon
Full moon
Complete phase sequence across nails
Moon Surface Details:
Craters and texture
Shadowed areas
Realistic moon appearance
Abstract Lunar:
Stylized crescent shapes
Gold or silver moon outlines
Minimalist moon representations
Combined Lunar Scenes:
Moon with stars
Moon with clouds
Moon phases with constellation
Hand-Painting Moon Phases
What You Need:
Thin nail art brush or striping brush
Dotting tools (various sizes)
White, gray, and black polish or gel
Base color (deep blue, purple, or black works best)
Top coat
Step-by-Step Crescent Moon:
Apply base - Dark color (navy, purple, black)
Place full moon - Use dotting tool to create circle
Create crescent - Paint over portion with base color
Add dimension - Highlight one edge with lighter shade
Add shadows - Darker shade on opposite side
Optional details - Tiny stars around moon
Top coat - Seal design
Moon Phase Series:
Paint different phase on each nail
Start thumb: new moon
Progress through phases
End pinky: full moon
Creates narrative across hand
Using Stickers and Decals
Advantages:
Precise, perfect shapes
Time-saving
Consistent results
Great for complex details
Application:
Apply base color
Wait until completely dry (or cure if gel)
Place sticker carefully
Press down firmly, especially edges
Apply top coat over sticker
Seal edges well
Types Available:
Metallic moon decals
Holographic moons
Moon phase strips
3D moon appliqués
Stamping Lunar Designs
Process:
Apply base color
Use stamping plate with moon designs
Apply stamping polish to design
Scrape off excess
Transfer to stamper
Stamp onto nail
Top coat to seal
Benefits:
Repeatable precise designs
Intricate details achievable
Multiple designs available
Gold Foil Moon Details
Technique:
Apply base color, let dry
Paint thin layer of foil glue where moon should be
Wait until tacky (not wet)
Press gold foil onto glue
Peel away foil sheet
Gold remains on glue
Top coat to seal
Effect:
Luxurious metallic finish
Reflective and eye-catching
Works for moons, stars, or abstract shapes
Combining Lunar with Other Techniques
Moon + Opal Chrome:
Opal chrome base
Hand-painted gold moon phases
Ethereal and mystical
Moon + Diamond Dust:
Dark base with moon
Diamond dust for surrounding stars
Magical night sky effect
Moon + Cloud French:
Cloud french tips
Small moon detail in clouds
Dreamy and cohesive
Combining Techniques for Ultimate Extra Celestial Looks
Layering multiple celestial elements creates show-stopping dimensional manicures.
The Full Celestial Manicure
Combination:
Thumb: Opal chrome full coverage
Index: Cloud french with diamond dust tips
Middle: Opal chrome with moon detail
Ring: Diamond dust tips only
Pinky: Cloud french
Effect: Cohesive but varied, each nail interesting
The Subtle Celestial
Combination:
Most nails: Soft opal chrome
Accent nail: Small moon detail
Tips: Light diamond dust fade
Effect: Wearable, sophisticated, hint of celestial
The Cosmic Drama
Combination:
Base: Deep midnight blue
Technique: Airbrushed nebula clouds
Details: Moon phases on each nail
Finish: Diamond dust constellation connecting moons
Effect: Artistic statement, full commitment
The Bridal Celestial
Combination:
Base: Soft white or nude
Tips: Cloud french with subtle pearl
Accent: Diamond dust on ring finger
Details: Tiny gold stars
Effect: Romantic, elegant, special occasion
Nail Shape and Length Considerations
Different shapes showcase celestial techniques distinctly.
Short Nails (Natural Length)
Best Techniques:
Opal chrome (works on any length)
Diamond dust tips (elongates appearance)
Simple cloud french
Minimal lunar details
Avoid:
Overly complex multi-element designs
Heavy contrast that shortens appearance
Pro Tips:
Keep elements proportional
Use lighter colors to lengthen visually
Focus on 1-2 techniques maximum
Medium Nails (Slightly Extended)
Best Techniques:
All techniques work beautifully
Full cloud french
Detailed moon phases
Combination designs
Sweet Spot:
Most versatile length
Balances artistry and practicality
Showcase detail without overwhelming
Long Nails (Extensions/Naturals)
Best Techniques:
Complex multi-element designs
Large moon details
Extensive cloud scenes
Full constellation maps
Considerations:
More canvas for artistry
Can handle more visual weight
Multiple techniques shine
Shape Impact
Almond:
Elegant, elongating
Perfect for cloud french
Moon details look graceful
Oval:
Classic, versatile
All techniques work well
Safe, flattering choice
Coffin/Ballerina:
Trendy, dramatic
Large surface for designs
Makes statements
Stiletto:
Bold, high-fashion
Long canvas for artistry
Dramatic celestial designs
Square:
Modern, clean
Chrome looks especially good
Geometric moon designs work well
DIY vs. Salon: What to Know
Understanding what's achievable at home versus requiring professional help.
DIY-Friendly Techniques
Easiest at Home:
Chrome powder application (with practice)
Diamond dust tips
Sponged cloud french
Sticker/decal lunar details
What You Need:
Basic gel lamp (if doing gel)
Chrome powder kit
Micro-glitter
Makeup sponges
Decals or stamping plates
Patience and practice
Cost Savings:
DIY full set: $30-50 in supplies (reusable)
Salon celestial set: $80-150+
Salon-Best Techniques
Professional Advantages:
Airbrush clouds (equipment required)
Hand-painted intricate moon details
Perfect application
Longevity and durability
Complex multi-element designs
When to Book Pro:
Special events requiring perfection
Complex combination designs
No time to practice
Want guaranteed results
Communicating Your Vision
Bring Reference Photos:
Screenshot examples
Multiple angles if possible
Specify elements you want
Be Specific:
"Opal chrome on all nails"
"Cloud french on tips"
"Diamond dust on ring finger"
"Gold moon detail on middle nail"
Discuss:
Timeline and durability needs
Budget considerations
Maintenance requirements
Longevity and Maintenance
Keeping celestial nails looking fresh requires proper care.
Making Them Last
Application Keys:
Proper nail prep (cleaning, dehydrating)
Cap free edges with top coat
Full coverage top coat
Gel provides longest wear
Expected Longevity:
Gel celestial nails: 2-3 weeks
Regular polish: 5-7 days
Chrome may dull slightly over time
Diamond dust can shed if not sealed well
Daily Care
Do:
Wear gloves for dishes/cleaning
Moisturize cuticles daily
Reapply top coat every 3-4 days (regular polish)
Handle with care
Don't:
Pick at edges or details
Use nails as tools
Expose to harsh chemicals without protection
Skip cuticle oil
When to Remove and Redo
Signs It's Time:
Visible grown-out line
Chipping or lifting
Dull chrome finish
Lost sparkle or details
Removal:
Soak gel properly (don't peel)
File gently
Give nails break occasionally
Condition after removal
Occasions for Celestial Nails
Understanding appropriateness helps you style confidently.
Everyday Wearable
Subtle Versions:
Soft opal chrome on all nails
Light diamond dust tips only
Minimal lunar details
Professional settings approve
Styling:
Keep colors soft
Limit sparkle intensity
Choose refined over dramatic
Special Events
Weddings:
Bridal celestial combinations
Soft clouds with pearl
Romantic and elegant
Photographs beautifully
Parties:
Full cosmic drama welcome
Experiment with combinations
Make statements
Instagram-worthy
Festivals/Creative Events:
Maximum artistic freedom
Bold color combinations
Multiple techniques
Express creativity fully
Seasonal Considerations
Winter:
Icy celestial with blues and silvers
Frost-inspired techniques
Cool-toned opal chrome
Spring:
Soft pastels with celestial elements
Warmer opal tones
Delicate details
Summer:
Iridescent and bright
Holographic finishes
Fun interpretations
Fall:
Warmer tones with lunar details
Duochrome chromes
Mysterious aesthetic
Troubleshooting Common Issues
Solutions to typical celestial nail challenges.
Streaky Chrome
Problem: Chrome appears uneven with visible brush strokes Solutions:
Use more no-wipe top coat
Apply chrome while surface is warmer
Use silicone applicator not brush
Buff more thoroughly
Diamond Dust Falling Off
Problem: Sparkle disappears quickly Solutions:
Use more adhesive base
Press dust in firmly
Apply thicker top coat
Seal edges carefully
Clouds Look Muddy
Problem: Sponged clouds aren't soft and pretty Solutions:
Use finer-textured sponge
Lighter pressure
Build gradually with multiple light layers
Clean sponge between colors
Moon Details Smudge
Problem: Hand-painted moons bleed or smudge Solutions:
Ensure base is completely dry
Use less polish on brush
Work with thin consistency
Top coat only when fully dry
Design Doesn't Match References
Problem: Results don't look like inspiration photos Solutions:
Practice techniques on practice nails
Accept your unique interpretation
Adjust expectations for skill level
Consider professional help for complex designs
Extra Celestial Nail Art Inspiration
Specific design ideas to try.
The Opal Galaxy
Full opal chrome base
Dark blue sponged at tips for galaxy
White stars dotted throughout
Diamond dust scattered
Moonlit Clouds
Pale blue base
White cloud french
Gold moon detail on accent nail
Pearl finish over everything
Constellation Mapper
Deep navy base
Diamond dust constellation patterns
Connect with thin gold lines
Moon phase on thumb
Aurora Shimmer
Opal chrome with pink/blue shift
No additional details needed
Pure iridescent beauty
Perfect for minimalists
Celestial Bridal
Nude base
Subtle cloud french
Light diamond dust on ring finger
Tiny gold stars
Mystical Moon Phases
Each nail shows different phase
Deep purple or blue base
Gold or silver moons
Surrounded by small stars
Conclusion: Your Celestial Nail Journey
Extra Celestial nails transform fingertips into miniature works of art celebrating cosmic beauty. By mastering opal chrome application, diamond dust placement, cloud french techniques, and lunar details, you create manicures that catch light magically and express your connection to celestial wonder.
Through understanding each technique individually and learning to combine them thoughtfully, we've explored how to achieve looks ranging from subtle everyday elegance to full cosmic drama. Your nails become canvases for ethereal expression, showcasing iridescent shifts, sparkling constellations, dreamy clouds, and mystical moons.
By committing to practice, investing in quality materials, and allowing your creativity to guide your celestial interpretations, you develop signature nail looks that feel both trendy and timeless. These techniques adapt to your skill level, lifestyle, and personal aesthetic while maintaining that otherworldly beauty defining Extra Celestial style.
Your celestial nail journey awaits—shimmering, sparkling, dreamy, and distinctly magical. With these techniques and creative inspiration, you can bring cosmic beauty to your fingertips and let your nails reflect the infinite wonder of the universe. Let your celestial light shine.